Archives for Photo Techniques category
White balance has to do with color temperature. If you have ever shot photographs using film indoors you are probably familiar with the yellow/orange or bluish cast that often washes over the scene. The reason for those casts of color is that all light has a temperature associated with it. The temperature of the light you are shooting in impacts the image by pushing the overall color towards red or blue. The lower the temperature, such as tungsten or standard household lighting, the more the color shifts towards red. The higher the temperature, such as fluorescent lights, the more the color shifts towards blue. In film photography you either deal with the color cast in your images or use filters on the lens to balance the color out.
In digital camera, particularly DSLRs, the camera generally has a white balance setting. You can select auto white balance or select from a number of pre-set options such as daylight, shade, cloudy, tungsten, etc. The camera will then compensate for the lighting conditions and color temperature so that the overall color hue of the image is accurate.
You can leave the white balance set to automatic, but as will all of the settings on your digital camera taking them off automatic opens up the possibilities for more creativity with your photography. Experiment with the different white balance settings and note how they each impact your subject.
These images were all taken of the same subject in direct sunlight. I adjusted the white balance setting on the camera itself to show the effect of each on the image. There is no Photoshop work on these images other than to re-size them and combine them into the one collage. The camera did all the white balance adjusting.
 Top Row L – R : Auto White Balance Setting, Daylight, Cloudy
Bottom Row L – R: Tungsten, Fluorescent, Flash (the setting, no flash used)
Notice in the tungsten photograph (bottom left) the blue cast. Since tungsten light has a lower temperature it shifts towards red. The tungsten white balance setting on the DSLR attempts to compensate for this by adding blue. But in a setting such as mine, where I am using the tungsten setting without any actual tungsten lights, the blue tone takes over the photograph.
 For this post, when I talk about color in photography I am not talking about using color film vs black and white film (or changing a digital setting to black and white). Although the choice between shooting in color or black and white can be a critical one, this post is about using color to enhance your composition and even as the subject of your photograph. For many amateur photographers we don’t often think about the mechanics of color when shooting, but all those technical details can really help make or break an image.
First things first, you probably remember the color wheel from your art classes in elementary school. The color wheel is the basis of how colors relate to one another. The official definition (via Wikipedia) is:
An abstract illustrative organization of color hues around a circle, showing relationships between colors considered to be primary colors,secondary colors, complementary colors, etc.
Keeping the color wheel in mind there is a lot you can do with the composition and subject of your photographs. Here are 5 ways to experiment with color next time you are shooting.
1. Monochromatic
 In a monochromatic image one color is used in varying degrees of saturation (the intensity of a color) and lightness, or shade. This results in several contrasting shades of the same color in your photograph. Look for a scene with one central color, blue for example. Factors such as the lighting can influence the shade of that color and make for a more interesting image. Avoid the obvious such as a photograph of the sidewalk. Yes, that will result in a monochromatic photo, but the excessive lack of contrast can make for a boring photograph. Using some creativity and your photographer’s eye you are sure to find a subject with varying shades of one color that make the photo both monochromatic and interesting.
2. Analogous
 Analogous refers to two or more colors that are next to each other on the color wheel. Yellow and yellow-green for example. One color tends to be the dominant color in the image while the other(s) are used to enrich the overall image. An analogous photograph is similar to the monochromatic one, but offers more variation in color and tone. If you take your time you can find analogous subjects to photograph in both nature or the man-made environment. You could also set up your own scene and experiment with different analogous color schemes.
3. Complimentary
 Colors that compliment each other are opposite each other on the color wheel. Red and green or violet and yellow for example. When colors are opposite each other they are thought to be in balance when they appear together. The intensity of each color is also increased when complimentary colors appear next to each other. This is referred to as simultaneous contrast. You can easily set up a scene to capture complimentary colors by gathering some objects and arranging them together for your photograph. Or challenge yourself and head out to find complimentary colors in your everyday environment.
4. Color and Light
The source of the light you are shooting in can have a dramatic impact on how color is perceived. The intensity of sunlight, for example, differs by hour of the day and time of year. Early morning and late afternoon light is much warmer (red) than midday light which is cooler (blue). Shooting the same subject in varying natural light will impact the colors of that subject. Other lighting sources, such as shade, florescent and tungsten bulbs and even flash can all result in the same color appearing very different in your photograph.
A great way to get a feel for the impact different light sources can have on your subject is take one (portable) solid colored subject and photograph it in varying light sources. Shoot it in the morning and again at midday and at sunset. Then move it indoors and shoot under regular household light (usually tungsten). The tone and intensity of the color will vary, sometimes greatly, depending on your light source.


Top – Tungsten Light Source Bottom – Sunlight at Mid-Afternoon Light Source
5. Color as the Subject
 Once you have an understanding of the color wheel and the various ways in which colors relate to each other you can step your photography up a notch and try getting artsy. One possibility is to use color itself as the subject of your photograph. Although there can still be a physical object in the photograph,work with the color itself making it the primary focus of the photograph. Use different tones, light intensities and complimentary, monochrome and analogous colors to create the image and see what you come up with.
I must admit depth of field has been a fundamental photography concept that has been difficult for me to master. Although I am far from mastering it I have managed to take the first step, which is understanding it. So I figured I would give the “Cliff Notes” version of depth of field for anyone else who is struggling to understand it.
What is Depth of Field?
Depth of field refers to the portion of an image that is in focus or sharp. It is a great tool to tell the viewer what part of the image is most important by only having that part in sharp focus. It is generally divided into two categories; narrow or shallow depth of field and great depth of field. Narrow or shallow means that a very limited (or narrow) part of the image is in sharp focus and the rest of the image, in front of and behind the main subject of the image, is blurred. Great depth of field is just the opposite. A greater portion of the image including the space in front of and behind the main subject is in focus.
How do you control depth of field?
There are three factors that affect the depth of field of your photograph.
- Aperture Size
- Focal Length
- Lens-to-Subject Distance
Aperture Size
Put simply, the smaller the aperture (the larger the f-stop #) the greater the depth of field and the larger the aperture (the smaller the f-stop #) the shallower the depth of field. So if you have three objects lined up at varying distances from each other and you want to capture the front object in sharp focus while blurring the others open your aperture way up to whatever your smallest f-stop is for the focal length you are using (f/5 for example) and focus on the front object (top photo below). If you want all three objects in relative focus close your aperture down to your largest available f-stop (f/22 for example) (bottom photo below).

large aperture/small f-stop = shallow depth of field
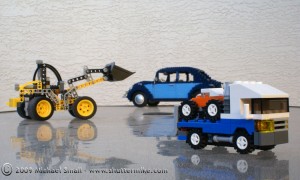
small aperture/large f-stop = great depth of field
Focal Length
Shorter focal lengths lenses result in a greater depth of field while longer focal length lenses result in a more shallow depth of field. For example if you are using a 35 mm to 70 mm zoom lens and focus on your subject at 35 mm with an aperture of f/8 you you will get your subject as well as more of the foreground and background in focus (top photo below). Then when you change the focal length to 70 mm at the same f/8 aperture the resulting depth of field will be narrow, meaning a blurred background and foreground and sharper subject (bottom photo below).

short focal length (~50 mm) = great depth of field
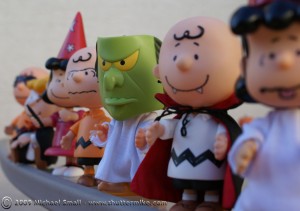
long focal length (~200 mm) = shallow depth of field
Lens-to-Subject Distance
The further you are from your subject the greater your depth of field will be. Conversely, the closer you are to your subject the more narrow your depth of field will be. For example, taking a photograph of a group of people in front of a scenic background from 20 yards away will result in both the people and the background being in focus. While moving closer to the people, say 5 yards, will result in the people being in more sharp focus while the background begins to blur.
further away from subject = great depth of field
closer to subject = shallow depth of field
In film photography ISO refers to the film’s sensitivity to light and is also called the film speed. The chemical makeup of the film is altered to either increase or decrease its sensitivity and speed. The lower the ISO number the slower and less sensitive the film is to light. Low speed film also results in less grainy photographs. The higher the ISO number the faster and more sensitive the film is to light. In simple terms that means in well lit situations, such as outdoors on a sunny day, you need a lower ISO film such as an ISO 100 and in less lit situations and action shots, such as indoors and sporting events, you need a higher ISO number such as 400.
So this may lead you to wonder why there is an ISO setting on your digital camera. There is no film to chemically alter and you either set it and forget it on auto or manually adjust your shutter speed and aperture to compensate for different lighting conditions and motion. So how does ISO fit into digital photography?
In a digital camera the film is replaced with the sensor. So ISO in a digital camera sets the speed and sensitivity to light of the sensor. Being able to adjust your ISO allows for expanded shooting options in different conditions. For example, if you leave your ISO on automatic the camera will, in most cases, chose a low ISO. In daylight conditions this will probably be acceptable. But in low light conditions you will need to compensate by extending your shutter speed or opening up the aperture. But a longer shutter speed can lead to camera shake and blurry pictures unless a tripod is available. So an easy solution is to increase your ISO. The faster “film” speed and greater sensitivity to light allows for shorter shutter speeds and less chance of blurred pictures from camera shake.
You will want to keep in mind that the higher the ISO the more noise a digital image can have (grain in film photography). Depending on the end use and final printed size of your image this may be an acceptable compromise to get the shot you want.
I shot the three photographs below in Scottsdale, AZ. The ISO setting from left to right was 100, 200 and 400. The aperture was at f/6.3 and the shutter speed was at3.2 sec for all three. As you can see, increasing the ISO allowed for the more sensitive sensor to take on more light and get a very different picture.


Click on the images to see a larger version. Then go out and take your camera off ISO auto and experiment.
If you do any significant amount of portrait photography or just photograph people with any regularity there is a photo editing program you should take for a spin. Portrait Professional works very differently than any other photo editing software that I have seen. I can’t explain all the programming and magic that goes on in the background to make this work, but it makes quick and easy work of retouching portraits. If you download the free trial you will be able to play around with some of the great features of this program using either the sample portraits they provide or on your own photos. Here are some of the things you can do quite easily with Portrait Professional:
- Fix skin blemishes such as pimples, moles, and spots
- Reduce and/or remove wrinkles
- Increase attractiveness (according to the software’s definition I suppose) by reshaping any aspect of the face
- Remove sweat or shin on skin
- Change hair color and thickness
- Adjust lighting on the face
There is a lot to this program and it works very well. Did I mention how easy it is? There is not a lot of learning needed to jump right in and start retouching portraits either. I played around with retouching one of the program’s sample portraits and feel that the rich features, ease of use and great end results make Portrait Professional a bargain for even the amateur portrait photographer at about $60.
Here are some screen shots of the portrait retouching I did with the Portrait Professional sample photograph. Click on any image to enlarge.
 Other then the usual angst of teenage acne this kid is not bad off and his BEFORE portrait shouldn’t require too much work. The great thing about Portrait Professional is that it allows you to do simple retouches to save a teenager from embarrassment all the way up to getting Vogue model air brushing-like results. Either way it is a pretty simple process and models and teenagers (or even teenage models) can be cleaned up quite nicely.
 A step-by-step wizard of sorts walks you through the first part of the retouching process. It begins with defining the facial features. The software asks you to click on various parts of the face such as the left corner of the left eye. Once these reference points are established you will see your portrait marked up with blue lines as though a plastic surgeon has taken his Sharpie to the face to indicate what needs a little nip and tuck.
 The 3rd step is to take the blue markings that the program placed on your portrait and adjust them. This is done through lining up various points with the outline of the facial feature you are working on. In the case at left it is the boy’s right eye and eyebrow. A simple click and drag process is all you need to do in order to line the “plastic surgery” marks up with the various features.
 You will do this same process on each eye and eyebrow, the mouth (as shown at the right), the nose and then the face as a whole. After you have everything lined up as you like it is time to let the Portrait Professional program do its magic. I could not begin to explain exactly what this magic is, but my best guess is that it matches up the marked up facial features with a database of “ideal” positions and starts adjusting.
As you can see from the before and after comparison below this simple four step wizard does a pretty decent job of cleaning the portrait up. Pimples and blemishes are gone and we have a new photograph that any teenager should be happy with.

 But you do not have to stop at what the wizard has to offer. After you get to the “after” stage above, you can keep going with additional more detailed adjustments of every feature of a portrait you can image. The tool box (at left) offers categories to start your additional virtual plastic surgery with including face sculpt, skin, eyes and mouth. And each of these categories expands to reveal multiple features for you to play with using sliding scales to create the perfect portrait.
 The skin option for example, allows you to give your pale model a tan; remove wrinkles (not necessary for our test subject, but great for those of us with a few years behind us); close up those pesky pores; and reduce overall imperfections to just name a few.
Portrait Professional is a very specific photo editing program, in that it is limited to portraits. However, it has taken that one limited field of photography and produced a very good piece of software exclusively for it. All of the human “imperfections” that some may see as a distraction to the ideal portrait can be addressed with ease. The learning curve is not steep at all and most anyone with a small amount of photo editing knowledge can pick this program up quickly. Finally the price is very attractive considering all you get. Download the free trial and see what you can do to spruce up your portrait photography.

“Pop Art Scooter”
 A few weeks ago I wrote a post about free online photo editors. There are a lot of them out there with a wide assortment of features. So I figured I would show a little bit of what they can do. This image was done using a photograph of my pug, Scooter and the online photo editor Fotoflexer. I’d like to say I slaved away at this for hours in order to master the “pop art” effect. But in reality the program makes it very easy. Here are the basic steps I followed to accomplish this final image.
- I cropped an image of Scooter so his head basically filled the frame (see the original image above right). I used Photoshop but you can also accomplish this in Fotoflexer.
- I then uploaded the image from my computer to the Fotoflexer program at www.fotoflexer.com.
- I then selected the “effects” tab and the “pop art” option.
- Et voila! Save the image back to my computer and I was done. A masterpiece in seconds.
OK, maybe not a masterpiece. But it is a fun program to play around with and turn your photographs into somethign creative and fun.
http://shuttermike.com/techniques/photo-editing-software/5-free-online-photo-editors/
I called this post an “attempt” at photographing lightning because it was the first time I ever tried to capture one of the frequent summer lightning storms in Arizona. And, although I actually did capture some lightning on my camera’s sensor, I feel that there is a lot of room for improvement.
I won’t give any how-to tips on this particular subject. For one, I have a long way to go before mastering the successful lightning shot and second, there are already some great sources out there on the subject. My favorite source for photography how-to advice, the Digital Photography School, has a great tutorial on How to Photograph Lightning.
I weeded through a lot of shots to pick out these three. These were all taken between 7 and 7:30 pm on September 8th. So just after the official sunset. The camera was set to aperture priority. I did some minor editing in Photoshop to tweak exposure and crop them. But for the most part they are true to how they were shot.
 f/7.0 – 4 sec – ISO 100 – Focal Length 100 mm

f/8.0 – 4 sec – ISO 100 – Focal Length 100 mm

f/7.0 – 4 sec – ISO 100 – Focal Length 130 mm
I went on a photo excursion to the relatively new Tempe Center for the Arts the other day. I had never been before and love the architecture of this building. I did not get a chance to go inside, but if it is half as impressive as the outside I will look forward to getting a chance to see it. I am going to post my general photographs of the building and grounds soon. But in the mean time I played around with focal length in one series of photos just for the sake of comparing what I got by standing in one spot and adjusting the focal settings.
I set the camera on aperture priority and kept the aperture constant at f/13. Since the camera was setting the shutter speed it varied slightly but only between 1/30 and 1/40 second. Then I focused on one spot and shot a series of photographs using 5 of the various focal lengths of m my 18-70mm lens. Here are the results.
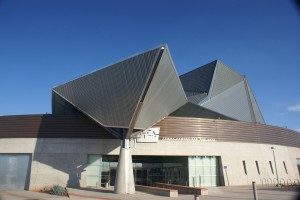
Focal Length = 18 mm
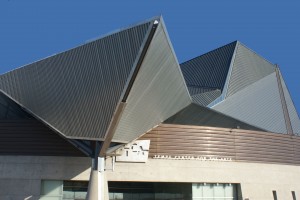
Focal Length = 26 mm
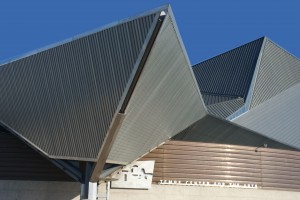
Focal Length = 35 mm

Focal Length = 50 mm
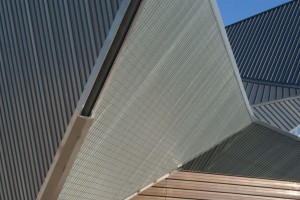
Focal Length = 70 mm
 Aside from displaying my photography, one of the purposes of this blog is to pass on some of the things I learn as I experiment with and explore photography. Since I have been doing so much night time photography lately I figured this was the perfect opportunity to list out some of the tips I have learned both through my own trial and error and through reading the numerous online tutorials that are available. I pointed out a few things I had figured out during my first attempt at night photography in San Diego a few months ago. That outing got me hooked and I have since done numerous additional photo shoots at night so I have picked up a few more tid-bits. Here are a few things that I hope will help you out next time you venture out with your camera after dark.
- I mentioned this before, but I think it is worth repeating, some method of keeping your camera steady, other than hoping for steady hands, is essential. A tripod is ideal for this of course. But if you do not have one available don’t let that dissuade you, you can always improvise with a nearby rock, bench, railing or anything to set you camera on and hold it steady.
- Most DSLRs now have some form of image stabilization or “Steady Shot” to reduce camera shake. I had not thought of this before reading DSLR Tips’ tutorial on Night Photography, but since you are using a tripod the mechanism in the camera or lens to compensate for camera shake is not necessary. In fact, they claim it can cause other distortions in your picture as it tries to correct for something that is not there with the tripod, camera shake. So turn this feature of your camera or lens off for night photography.
- Depending on the effect you are going for, this may not be a blanket rule that applies to all photography after dark, but in general set your aperture (f-stop) to its lowest setting (widest opening). This will allow for the most light to reach the sensor.
- With your aperture fully open you can leave it alone and only adjust your shutter speed with each shot. Try the same shot with varying shutter speeds. You can even bracket by shooting at one speed then trying the next speed up and down capturing each image three times at three speeds to determine which works best.
- Finally, this rule is not limited to night time photography exclusively, but all of your photography in general. Have patience! Being in a hurry may result in some nice snap shots, but not necessarily the great photographs you are aiming for. Slow down and think about what you are doing, what your camera settings are, and what you want to accomplish with the click of the shutter.
 Top Row L – R : Auto White Balance Setting, Daylight, Cloudy
Bottom Row L – R: Tungsten, Fluorescent, Flash (the setting, no flash used)
 For this post, when I talk about color in photography I am not talking about using color film vs black and white film (or changing a digital setting to black and white). Although the choice between shooting in color or black and white can be a critical one, this post is about using color to enhance your composition and even as the subject of your photograph. For many amateur photographers we don’t often think about the mechanics of color when shooting, but all those technical details can really help make or break an image.


