As with any hobby, amateur photographers could easily go crazy buying all the latest and greatest photography gear. Have you ever seen an avid woodworkers home shop or a scrapbookers hobby room? They are filled with special tools and equipment designed to make the end result better. But does the latest laser guided table saw really result in better crafted furniture? Do the titanium sculpting scissors make a better laid out scrap book page?
The same questions can be asked of photography gear. Is it the photo gear that improves photography?
There are three factors that lead to a good photograph in my view.
- The equipment and gear used
- The technical knowledge of the photographer
- The artistic eye and ability of the photographer
Having all three is an asset for creating better photographs but not necessarily essential. In the end you can have the most expensive telephoto lens on the market today, the fanciest tripod, and a top of the line camera but if you do not know how to operate any of it or if you just do not have an artistic photographer’s eye none of it is going to produce better photography. It is not the gear alone that makes the photographer. In fact a talented photographer can often take a master shot with the simplest of photography gear.
All the latest and hottest gear is fun to have. But before spending a fortune equipping yourself spend some time improving your skills. Study the art of photography – formally or on your own – and practice, practice, practice. That will make you a better photographer who can then improve upon your art with all the great gear available.
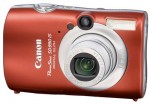 In my last post I talked about 5 things to pay attention to when photographing. I’ll take it one step further and say you can be scouting out potential photography subjects and be paying attention to these five things all the time. You never know when you might come across something you would like to photograph but may not have the time at the moment of discovery. A pocket size point and shoot camera and notebook kept nearby at all times come in handy for just these situations. You can take a quick snapshot (or 5 or 6) of the subject and jot down some notes as to the location and what it is you think you want to focus on when you return with your SLR or DSLR. Then when you return to your computer, down load the images and connect them up with your notes. You can do this either by printing the images and and transferring your notes to the back or even by pasting them into a Word document and typing in the notes. That way you have a file of future photography subjects to explore at a later date and you won’t end up scratching your head trying to remember where you saw that great photo opportunity.
For my photography a tripod is an essential piece of equipment. My night and long exposure photography cannot be done without one. Therefore I think investing in a good, quality tripod is important. When it comes to tripods you can spend a very wide range of money on one and get a very wide range of quality and functionality. You can spend $30 – $50 on a simple one at someplace like Target or up to $400 on a very advanced model. Before grabbing the cheapest one or investing a large sum in the top of the line there are a few things you should consider.
- Where will you be using it? Indoors or out? Different models maybe better suited for the rugged outdoors while some are ideal for indoors studio use.
- What is your budget? Get the best one you can afford, but be reasonable the more you spend does not equate to the better the photograph you end up with.
- How heavy is your camera with your largest lens? Make sure the tripod you get can support the weight.
After my inexpensive SunPak tripod had succumb to overuse I shopped and asked around for a model that was an upgrade yet under the $200 mark. I wanted something that would last, was rugged enough for outdoor use and could hold my camera and my fantasy lenses that I yet to have.
 I ended up with the Induro AB2 Tripod Kit. Going with a kit is a cost saving way to buy a tripod. Otherwise you need to buy the legs and head as two separate pieces. At about $180, I felt this was a good price for what you get. And what you get for that is:
- a 66.5″ tripod when fully extended (28.5 inched when collapsed)
- a ball head
- two bubble levels and a compass built in
- 3 section quick locking legs
- load capacity up to 18.7 lbs – that should hold even the fancy lenses
- And a carrying case to boot
I have been using this tripod for a few months now and have no complaints.
- It is quick and easy to set up and adjust.
- The legs are sturdy and provide even, level footing on all the surfaces I have tried so far.
- The ball head allows for movement in any direction with ease.
- The camera can be mounted and released quickly.
Overall I feel I got my money’s worth in a solid, quality tripod that will last me for years to come. I did not buy the top of the line, but I got something that meets the needs of the photography I do and the camera equipment I own. The bottom line with tripods is that you should not skimp, but it is not necessary to go overboard either. Knowing what will fit your photography style is key and you can easily find something in your budget that you are sure to be happy with as I am with my Induro AB2.
 I wrote a review of my Lowepro Fastpack 250 camera backpack not too long ago. I figured I would follow up that post with one about what I fill all that space with. Depending where I am heading and what I intend to shot the contains can change. And occasionally this bag is too much for what I am doing and I will switch to a smaller bag that only fits my DSLR with a lens and a spare battery. But in general, here is what you might find at any given time in my camera backpack.
The Obvious
- Sony Alpha 100 DSLR
- Lenses – 100-300 mm 4.5 – 6.7, 18-70 mm 3.5-5.6, 28 mm 2.8, 28-90 mm 3.5-5.6
The Accessories
- Filters – circular polarizing, standard polarizing, 81B and 1A all purpose
- Lens hood
- Compact flash cards – 4 total – 1 512mb, 1 2GB, and 2 4GB
- Remote shutter release
- Extra tripod shoe
- Fully charged spare battery
- Battery charger
Nice to Have
- notepad and pens
- The manual to my camera
- small flash light (comes in handy when trying to set up the tripod and camera at night)
- A small point and shoot camera (with spare batteries)
- Lens cleaning solution, cloth and and tissue
Up until recently I did not pay much attention to the fundamentals of photography. I shot what i liked and tried to be artistic and creative with it. But I did not know much about aperture and shutter speed or composition (still have a lot to go on that one) or the equipment I was using. As I get more serious about photography and am trying to continuously improve and take my photography to the next level I am getting more into the nitty gritty. So I am reading, surfing the Internet and finally taking an introductory course to digital photography at a local community college.
I’m sure I am not the only amateur photographer out there who has been winging it. So I am going to pass along some of my “discoveries” through Photography 101 posts. I do not anticipate that these are going to be life altering discoveries. In fact they are the 101 of photography, the basics. But sometimes we are so excited to get shooting we skip right past the basics. Even though you may not need to (or want to) study every detail, I hope these are things that can help you improve your photographs as they are doing for me.
The first Photography 101 is on lenses.
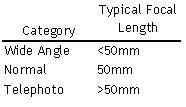 Lenses fall into three main categories and are measured in focal length (although focal length is not the only characteristic you want to consider when purchasing a new lens). The chart at the left outlines those three categories. But keep in mind that the “normal” lens can vary slightly and it is safer to say the focal length of a normal lens is about 5o mm and the wide and telephoto options fall into place accordingly.
Normal is called such because it is considered the lens that is as close to what the naked human eye would see, about 50 mm. A normal lens is typically a prime lens meaning that is has a fixed focal length without zoom capabilities. Some of the advantages of such a lens are that they are generally cheaper and produce a slightly better quality picture.
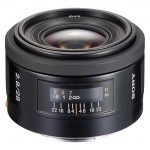 Wide angle lenses have a large depth of field making it easier to have both the foreground and background in focus. They also, as the name implies, present a view that is wider than normal. With focal lengths less than 50 mm, 28 mm is considered a standard wide angle lens. 24 mm and 35 mm lens options are also common. Fish eye lenses also fall into the wide angle category. Although it is an extreme wide angle that does not correct for distortion. You have probably seen these images that are often times circular.
 The final category is the telephoto lens. Lenses with a focal length greater than 50 mm (give or take) fall into the telephoto category. Standard telephoto lenses will usually fall between 80 mm and 130 mm. Medium focal length telephoto lenses will usually fall between 135 mm and 300 mm while super telephotos can be found all the way up to 1000 mm.
A few other terms to keep in mind:
prime – a prime lense can fall into any category. It simply means the lens has a fixed focal length.
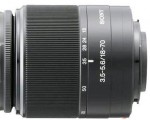 zoom – It is often confused with telephoto, but zoom and telephoto are not one and the same. Zoom means the lens has a focal length range, in contrast to prime, allowing you to zoom from one focal length view to another. For example my 18 – 70 mm lens lets me zoom between an 18 mm wide angle view and a 70 mm telephoto view. Any category can have zoom lenses and they can cross between categories.
Here are the lenses I currently own:
- 18 mm – 70 mm
- 28 mm prime wide angle
- 100 mm – 300 mm telephoto
- 28 mm – 90 mm
I am hoping to add a 500mm telephoto soon.
 I bought the Lowepro Fastpack 250 camera backpack a few months ago because I was getting more lenses and accessories than my small camera bag would hold. There were a few selling point that sold me:
- It was a backpack – easier to carry then on over the shoulder bag
- It is designed to hold a laptop
- It is roomy and can hold a camera body with lens and an additional 3-4 lenses depending on their sizes
- The side entry access to the camera without having to open the whole bag
Now that I have been using the bag for a few months I have had a chance to discover its pros and cons. Here are a few things that are worth knowing.
Pros:
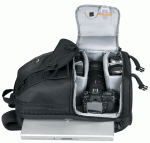 Lowepro makes a very sturdy and well constructed bag. This bag can go anywhere and endure a lot while still protecting your gear.
- The side access to the camera is a great feature! It is so easy to just flip the bag around and pull the camera out quickly without needing to worry about anything else falling out or having to dig around.
- The camera and lens compartment has padded dividers that can be moved around and stuck in various positions with Velcro. This versatility is great for making all your lenses and flashes fit snugly.
- There are compartments for all the things you need. Water bottle, memory cards, extra battery, pens, and all the odds and ends.
Cons:
- The top compartment tends to get easily disorganized. If it had some way to compartmentalize the space like the lower section has that would probably help.
- I also don’t think the upper compartment opens wide enough hindering easy access just a bit.
- There is no easy way to strap on a tripod. Some additional straps and buckles on the bottom would be ideal.
- This is a big bag and it might be too much for some people. It is great for when you need to bring everything, but a bit too much for shorter photo trips. Full of equipment and a laptop it can also get rather heavy.
Overall I am very pleased with my purchase. The Lowepro Fastpack 250 is a well designed, roomy and sturdy camera backpack. I have only one problem now. I went from one extreme to another and now I need something in the middle for times when I want to bring an extra lens or two but don’t need all of my equipment. Guess I will need to start searching for a mid-size bag.


