Archives for General Photography category
Many freelance photographers keep a close eye on the creative gigs section of Craig’s List and similar sites for potential freelance photography jobs. Although it can be hit or miss, and if you are relying on these ads for your income you are probably going to be in trouble, if you pay close attention every once in a while a gem comes up. However, if you monitor these postings frequently you have undoubtedly also noticed the occasional (sometimes frequent) post looking for photography services for free or in exchange for permission to use the photos in your portfolio, a link to your site or “exposure.”
I am not talking about the one where an up and coming model is seeking an up and coming photographer to work with so they both can get some practice in and end up with images for their portfolios. Instead, I am talking about the businesses, and sometimes individuals, looking to get their photography needs met for free. The requests include everything from product photography to corporate head shots to wedding photography. And it is not just limited to photographers, but you see similar ads for graphic designers and other creative fields. The advertisers often make statements about “no money in the budget this time, ” or “there may be more work down the road.” But the bottom line is they want something for nothing.
The question that is often debated in regards to these postings is “Are these businesses and the photographers who accept non-paid jobs hurting the photography industry as a whole?”
The heated debates that have been going back and forth in the craigslist postings have centered around taking advantage of creative professionals and expecting it to be for free. One post snarkily requested free surgery in exchange for mentioning this surgery to help get future surgery jobs and the potential for more surgeries in the future if the patient liked your work. The point being of course, that you would not request a freebie from other professionals, why from creative professionals?
The argument among professional photographers is that when others take these jobs for no pay they are diminishing the photography industry and lowering the standards and pricing for photography as a whole. Not to mention devaluing themselves and their skills as a photographer. In addition, it puts the photographer at a lower status in the mind of the consuming public, be it businesses or individual consumers, compared to other professionals they deal with who would never give their services away for free. But as long as someone is willing to work for free someone is going to take advantage of it.
But for many of these up and coming photographers they are in a bit of a catch 22. They want to build a professional portfolio in order to be hired for paying gigs, but they need the gig to build the portfolio and the portfolio to get the gig. So what do they do? They often turn to working for free without even realizing the potential consequences thinking that getting the images for their portfolio is payment enough. What many photographers, and especially these advertisers, may not understand is that as soon as you take the photograph you own the copyright to it. You are free to use it in your portfolio regardless. You do need a model release to use someone’s likeness for advertising or commercial purposes, but you still own the rights to that image. So they are not really giving you anything in exchange for your work other than maybe the subject to shoot.
There are some alternatives to working for free to build up a portfolio however. Alternatives that can serve both your needs and keep the photography profession at the same level as other (paid) professional services.
1) Volunteer your photography services to a non-profit that you support and believe in. This can be a a win-win for both; the non-profit gets their photography needs met and you get images for your portfolio.
2) Ask your friends, family, neighbors to be your subjects. For the aspiring portrait photographer you probably have an abundance of subjects all around you.
3) Go out on your own and shoot. If your interest is product photography, look around your house. Photograph the milk, the laundry detergent, your iPod, anything. Want to photograph architecture? It is all around us, jsut head out and shoot it. You can build a good portfolio of images just by shooting for yourself.
4) Try charging. Not every potential job is going to require a portfolio (although some idea of your photography skills is going to help). Put your own ad up for your photography services and see who bites. You might be surprised.
I featured just the bike in yesterday’s motorcycle photo collection post and today’s photo collection is the same bike but with a model featured as well. I had to travel far out of my comfort zone for this photo shoot. The intimidation factor of shooting a live model, in front of a group, for a grade, with a five minute time limit made for an intense situation. However, even though I do not see any potential photography career going down the portrait road (at least exclusively), I think it is a very good thing to be forced outside of your comfort zone. To have the ability to shoot people, models or everyday people, in my back pocket is a good thing. Plus the lighting and composition skills can be applied to much more than people. So I started this shoot being adamant about having no interest in shooting people. But after reviewing and editing my images I think I need to explore this area a bit more. Architecture photography will always be my first passion, but photography like this can be fun and definitely worth exploring more.
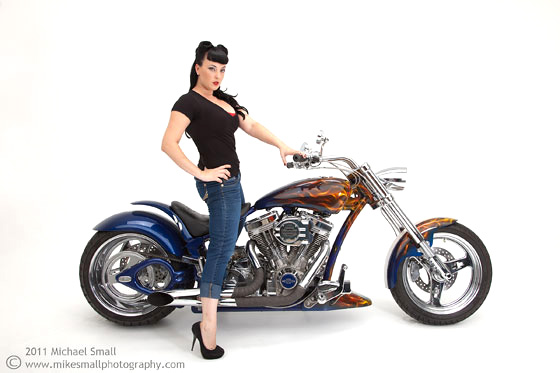
f/14.0 – 1/160 sec – ISO 50 – Focal Length 32 mm
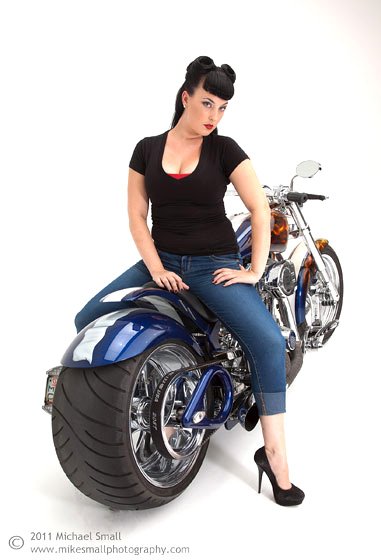
f/14.0 – 1/160 sec – ISO 50 – Focal Length 32 mm
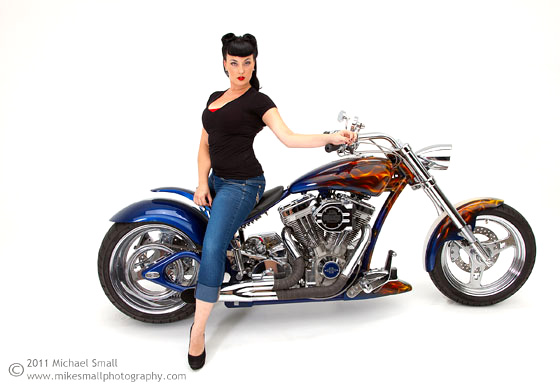
f/14.0 – 1/160 sec – ISO 50 – Focal Length 28 mm
Whether you are a professional or amateur photographer one thing you probably face often is where to shoot. Sometimes I get the urge to go out and shoot but I draw a blank on good photography spots. So I have a photography spot scouting process I follow. It is not actually a formal process, but more of a way to keep track of places I may want to shoot someday.
You will need a few tools for this, but nothing too fancy is required.
1) A notepad. If you want to get high tech a tablet device such as an iPad works great.
2) A point and shoot camera. Again, nothing fancy required. Just a basic point and shoot or even your cell phone camera will do.
The “process”:
You can either do this deliberately or just keep track as you go about your daily life. Or, better yet, do both.
This is really simple. Take an hour or two on a weekend and just head out with the above tools in hand. Where you head will depend on what you like to shoot. Architecture? Head to your city’s downtown or try something different like and industrial area of town. Portraits? Just about anywhere will do. Landscapes? Pick a direction and take a drive.
Then just keep an eye out for anything that strikes your interest and take notes. For each location or potential subject that you think you might want to come back to write down the following:
- Location. Make sure you are specific enough that you will be able to find it again later.
- Angles and potential compositions. Where were you standing when it looked best? How might you frame it? What surrounding elements will you want to include in the image?
- Lighting. What direction does the subject face? Will sunrise lighting or sunset lighting be optimal for photographing it? What are the shadows like?
- Challenges. What potential problems might you encounter when you come back to photograph? Are there crowds? Will the leaves have lost all their leaves? Is there construction now that may be gone later?
- All the rest. If you think it will matter to your photograph make a note of it.
- Finally, take a few quick shots with the point and shoot just to give yourself something visual to come back to.
Now you have a documentation of someplace you can come back to either when the mood to photograph strikes or when you have a client looking for a unique location. And as you build your list you will have a catalog of shoot locations to go to whenever the need arises.
I recently had someone say that they did not see the commercial value of another photographer’s work so they were not sure what he was going to do with his photography. I found that to be an interesting statement especially from another photographer. Is photography not an art form like sculpture or painting? Do we look at a painting and question its commercial value or is it first a work of art and then, if the artist is lucky, it might be sold? Is a photograph a failure if it does not have obvious commercial value?
I think there are few people that will argue the inclusion of photography in the arts. But photography also stands apart from most other art forms in that is often seen as a business transaction, a commodity and a commercial endeavor. To some it serves a very utilitarian purpose and is an art form as a very distant second, if at all. But I would argue that it is always an art form, albeit not every artist is successful. Whether we as photographers are photographing a fashion spread, a piece of real estate, a cookie for a cookbook or the new packaging for a toilet bowl cleaner, each takes an artist’s eye and creativity as well as knowledge. We use our knowledge and experience with lighting, composition, color and form to compose the perfect image regardless of the subject or its intended final use. The art is in the creative process not just the end purpose of the photograph.
Since photography so readily and so often crosses over from art to commercial it is classified differently than a painting or sculpture by most. It is a common everyday thing that is often seen as either a snapshot or a commercial work for marketing or advertising. Art tends to get forgotten. Maybe that is because it is a newer art form, relatively speaking. Painting, sculpture and architecture have been in existence for centuries while photography is barely over 100 years old. So we are conditioned to see a painting as art first and consider its commercial value second. Photography also has the disadvantage, or advantage depending on your viewpoint, of being much easier to use for commercial purposes, especially in the age of digital. Few illustrators or painters are commissioned to do works for advertising anymore causing the two medias to be separated.
I think the person who made the comment about the lack of commercial value and therefore the lack of value in general for this one photographer’s work was short sighted in his view. Being a working photographer he relies on his work having commercial value and was not thinking beyond that. A photographer who works strictly for the artistic value of his work may see things completely opposite and not understand why another photographer would “sell out” to the ad man. But both end purposes can coexist in photography. In fact, some photographs can have both commercial and artistic value. The great ad shot that becomes iconic and winds up in a museum and the artistic photograph that sells for millions on the auction block. One does not need to be sacrificed for the other.
I think as a photographer I should approach each shot I take as art, regardless of whether I am shooting it for a client or to hang in a gallery. If I strive to make each shot a potential gallery shot I feel that I will put that extra ounce of effort in to it thereby making each end photograph my absolute best. Photography is an art form that has tremendous commercial potential. It can easily cross the boundary between art and commodity which makes it a bit unique in the art world.
On September 1, 2001 I took my fist trip to NYC. This was before I was heavily into photography but I did have a camera (film) with me of course. Being my first trip the plan was to pack every possible site into that one week. The Statue of Liberty, the Brooklyn Bridge, Times Square, Central Park, The Empire State Building the museums, you name it. Of course, that list also included a trip to the top of the World Trade Center. On Monday, September 3, 2001 we bought our tickets for the elevator ride to the top. The views were amazing and you could see 360 degrees around the entire city, into Brooklyn and the Bronx and across Manhattan and the river into New Jersey. My photography at the time was in its infancy. But a lot has changed in the past ten years and my skills have developed quite a bit if I do say so myself. It is unfortunate that shots like these can never be captured exactly the same again. But I am grateful that I had the opportunity to enjoy the World Trade Center. I have been back to NYC numerous times since and love the city.
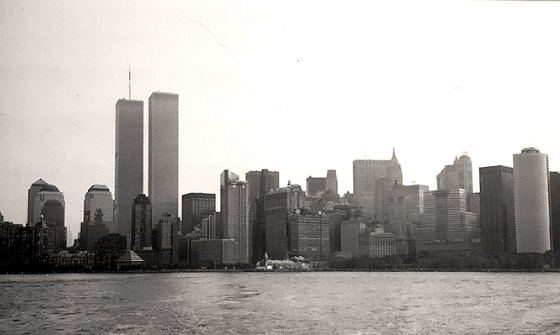
World Trade Center
New York, NY
Taken from the Liberty Island Ferry
September 4, 2001
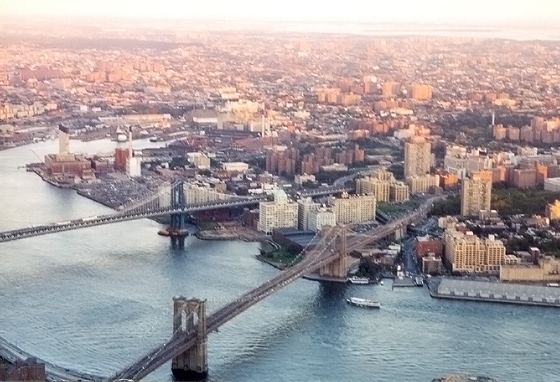
View of the Brooklyn and Washington Bridges from the top of the World trade Center
New York, NY
September 3, 2001
As a photographer in the 21st century who has at least some knowledge of the internet, you have probably heard of Creative Commons. But understanding Creative Commons may be a whole different story. What is it? How does it work? And how is it different from copyrights?
Prior to the late 1990s, when Creative Commons came into existence, there was only copyright law. In the 1976 Copyright Act a copyright is defined as giving the author or owner of the copyright an exclusive right to control how their copyright work is used, reproduced and distributed. Copyright applies to “original works of authorship” which can be literary, musical, dramatic, artistic or other intellectual work, whether published or unpublished and remains valid for 70 years after the death of the creator. You also don’t have to register a work for it to be copyrighted. The copyright applies as soon as it is recorded, written down, captured on film or sensor, drawn on paper, etc. However, in the US at least, registering your copyright with the US Copyright Office can give you additional rights and recourse if those rights are violated.
So isn’t that good enough? In many cases yes. However, with the rise of the internet, sharing creative works rose as well, both legally and illegally. Some thought that copyright laws, as they were currently written and enforced, were not flexible enough for the age of the internet and digital works. So the Creative Commons was designed to be a less stringent method of copyright that fostered increased access to and sharing of intellectual and artistic works while still giving the original creator of the work some degree of protection. With Creative Commons the artist, author or creator is given the ability to decide which rights they want to keep and which they chose to waive. The intention was a win-win for everyone. The creator would have protective rights to their work while the end user got flexibility to use the works without the restraints of all or nothing copyrights.
Creative Commons is often referred to the middle ground of copyrights, the “some rights reserved” version.
All Right Reserved -> Some Right Reserved -> Public Domain
Copyrights -> Creative Commons -> Free to use with no restrictions
So how does this work? Essentially you select the Creative Commons license you want to assign to your creative work to grant copyright permissions to it and associate that license with your work. For online work you can do it with a bit of coding. For offline work you can use the old fashion manual way of indicating a copyright on your work.
There are 6 licensing options to pick from. From least to most restrictive they are:
 Attribution: Under this license the creator is allowing others to copy, distribute and transmit the work; to alter/remix/rework it and to use it for commercial purposes as long as attribution is given to the originator. Read the legalese version of Attribution here.
 Attribution – Share Alike: This license is very similar to Attribution with one addition. The creator is allowing others to copy, distribute and transmit the work; to remix/rework it and to use it for commercial purposes as long as attribution is given to the originator. AND, if you do alter the original work you can only distribute it under the same or similar license – share-alike. i.e. no claiming complete copyrights to it. Read the legalese version of Attribution – Share Alike here.
 Attribution – No Derivs: This license allows you to copy, distribute and transmit the work even for commercial purposes as long as attribution is given to the original author/creator, BUT you are not allowed to alter or rework it in any way. Read the legalese version of Attribution – No Derivs here.
 Attribution Non-Commercial: With this license you are allowed to copy, distribute and transmit the work and can alter/remix/rework it, just not for any commercial purposes as long as attribution is given to the original author/creator. Read the legalese version of Attribution Non-Commercial here.
 Attribution-NonCommercial-ShareAlike: See the pattern here yet? This license allows you to copy, distribute and transmit the work and you can alter/remix/rework it, but you must attribute it, no commercial use and if you do alter the original work you can only distribute it under the same or similar license – share-alike. Read the legalese version of Attribution-NonCommercial-ShareAlike here.
 Attribution-NonCommercial-NoDerivs: Last one, and the most restrictive. The rights with this license limit you to copying, distributing and transmitting the work. But no altering it, no commercial use and you must attribute it. Read the legalese version of Attribution-NonCommercial-NoDerivs here.
Make sense? The concept is not too difficult on the surface if you understand the basics of copyright and the mission behind Creative Commons makes sense given the “free for all” mentality of the internet. But critics question how it stands up legally and if Creative Commons just feeds the “if it’s on the internet it’s free for me to take and use as I wish” attitude that is so common. Does Creative Commons just muddy the copyright waters?
Today, August 19th, is World Photography Day. I’m pretty sure there isn’t a Hallmark card for today, although maybe there should be. So don’t be too upset if you have never heard of World Photography Day or did not get an invitation to a big celebration in the mail. It is one of the lesser known holidays. This is just a day to celebrate photography which with a camera in almost everyone’s pocket now, tends to be taken for granted. But in the grand scheme of things, it was not that long ago that photography was a rarity and considered a luxury. So the purpose of today is acknowledge the role photography plays in our lives as both a moment capturer and an art form. So get your camera out and take a photograph todorld Photography Day and the 1000 post anniversary of Shutter Mike, just a coincidence.

341 E. Camelback Rd., Phoenix, AZ
This building, designed by famous Phoenix architect Alfred Beadle, is classic Arizona mid-century modern architecture. Or at least it was. This photo was taken before they tore off the block facade in order to make the building much more “functional.” Sad, but still represents one of my favorite photography types, architectural.
Before you get halfway through a shoot and realize you left the ISO on 1200 or white balance on tungsten it is a good idea to make is a part of your photo shoot habit to check and reset all your camera’s settings. To help me get my best shots I have come up with a short pre-photo shoot camera check list. These are all the things I need to quickly verify are as they should be for the shoot I am about to do and not as they were for the last time I was photographing. Your camera or specific needs may be a little different but this should be a good starting point for you to make a check list of your own.
- Anti-Shake (Stabilizer) On/Off – When shooting on a tripod it is a good practice to turn this feature off. So if the next shoot does not include a tripod make sure you turn it back on. Or vice versa.
- ISO Setting – You may not adjust this setting much depending on what and how you photograph, but check it to make sure it is set for the lighting condition of your current shoot.
- Manual / Auto Focus – You’ll notice if this is not set right pretty quickly, but helps to make it a habit to make sure it is where you need it to be.
- RAW/JPEG Setting – I rarely shoot anything other than RAW, but there is always that one time which could ruin the photo shoot the next day. Better to just check each time.
- Drive – This may be called something else on your camera, but it is where I set my bracketing and continuous shot settings which I change often.
- White Balance – Maybe you leave it on auto all the time, but if you ever alter this setting for various lighting conditions you’ll want it on your check list.
- Focus Area – This includes Wide, Spot or Local for the Sony Alpha 850 I shoot with, but whatever your camera calls it, it’s better to have it set where you need it before you start shooting.
- Clean the Lens – OK, so this is not a camera setting, but it is something you should definitely get in the habit of doing every time you go out to photograph.
There you have it, eight quick and easy things to check every time you pick up your camera for a photo shoot. Making sure you have your settings right can save you a lot of time and trouble. Did I miss any that you have on your list? Let me know in the comments.
I came to the HDR (High Dynamic Range) photography party late. Before I really understood what HDR was all about I saw so many photographs processed using the “grunge” and “painterly” settings for HDR and I thought they were just too over-processed for my taste. So I associated all HDR with those looks. But after I started playing around with it I realized there were so many more options. Also, for architectural and real estate photography HDR can save an image by allowing you to expose for both the light and dark areas of your subject and then merge them into one perfectly exposed image. There is still room for artistic interpretation as well and if the grunge or painterly or another custom processing of your image works then that is great too.
Here are two images to give an idea of what you can do with HDR photography versus processing the same image in PhotoShop.

This is the PhotoShop edited photograph. I did not do much here but I did increase the vibrance and saturation a bit and lightened the image overall. This is not a bad image in general. But the sky is very dull and the shadows in the lower left corner are a little dark.

This is the HDR processed version of the image above. It is a combination of three exposures of the same scene; one exposed normally, one over exposed and one under exposed. This is the essence of HDR photography in that it allows you to correctly expose for all areas of the scene with different shots and then merge them all together. This image is not perfect either; the saturation could be toned down a bit and the patio furniture has lost its true color. But those things are easily corrected and it is more a matter of personal taste. What is more important is the sky and the dark areas. I was able to expose for the sky alone in one image and capture the blue hues and the glow of the late afternoon sun. The shadows on the back wall and around the rocker are also now gone.
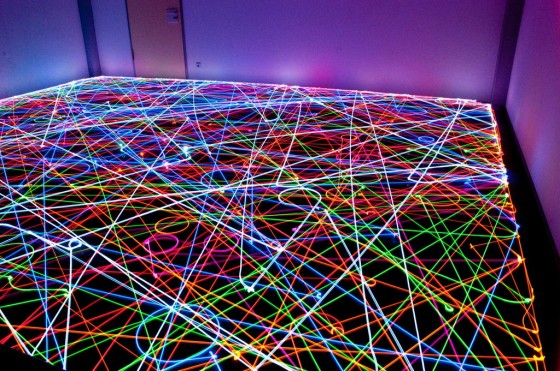
Who knew the Roomba was good for more than just vacuuming? But someone got creative with their Roomba, and LED light and a camera. Using a long exposure and letting the Roomba do its things in a dark room with a light attached results in some cool images (especially if you have a team of Roombas to work with). Check out a variety of Roomba photographs here.
